This post is brought to you by DecoArt. All opinions and text are my own.
Give your kitchen table a refresh with chalk paint! You’ll be amazed what a difference some color makes!

From the moment our kitchen table arrived off the delivery truck, I had buyer’s remorse. That was about nine years ago. I didn’t say anything to my husband, but I was never completely pleased with our purchase. I wanted to be, because it was definitely an investment piece, but I wasn’t a huge fan of the style or all-over wood color. And then after we moved to our home two years ago and placed the table on the wood floors, I knew it needed some attention and a new life. It was extremely “blah”! Nothing exciting going on at all, and I like to keep things interesting. 🙂
The table blended in with the floors and was begging for help to reach its full potential. We didn’t want to put money into purchasing a new table, so we decided to save some cash and revamp our current one. My husband agreed to help me update it, so we took on the project together one weekend. It did take quite some time, but it was definitely not hard! Anyone can do this!
I tested quite a few colors on it before I finally settled very contentedly on Americana Decor Chalky Finish paint in “Enchanted”. It was love at first sight.
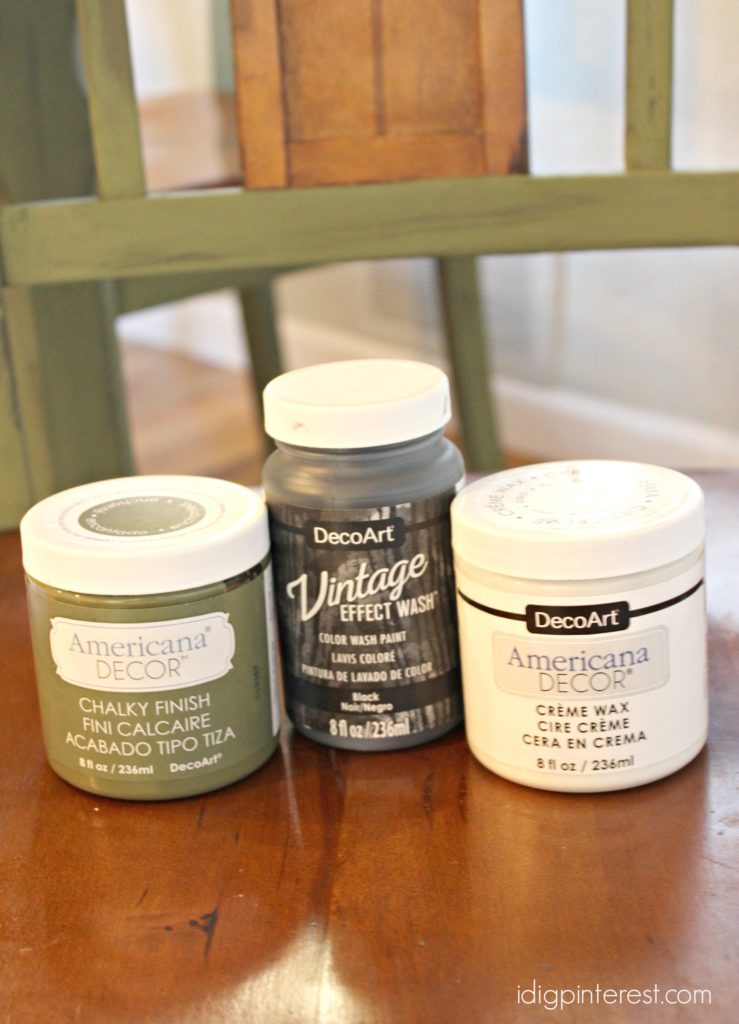
I also used DecoArt Vintage Effect Wash in black to give it a distressed look and Americana Decor Creme Wax in clear for a protecting coat to finish it all off. You can shop for these products online or at these major chain stores.

The table and chairs look like they’ve got some good aging and loads of character! Plus, they really pop!
Now, whenever the kids put a ding or scratch in it, we’ll love it all the more! 🙂 I always wanted our dining table to be a place where the kids can do art projects and crafts to their heart’s content, without me having to bite my nails the whole time. Which is exactly why I’ve never been a fancy shmancy kind of girl, as far as my furniture tastes go. Everything must be completely kid friendly!

Look at those gorgeous legs! The DecoArt Vintage Effect Wash really helped bring out the beautiful details and scroll work.

The wonderful thing about chalk paint is that you don’t have to sand and prep the surface before! We literally just started painting and it stuck, even on the shiny finish. We chose to leave the top of the table in the natural wood and also the seats and a portion of the backs of the chairs. We did tape off the sections of the chairs where we didn’t want the paint to get. We turned the table upside down to make painting much easier. One coat is typically enough.
Let the chalk paint dry completely before you start using the distress paint. I grabbed an old rag, poured the DecoArt Vintage Effect Wash into a disposable bowl, then dipped just a small section of the rag, blotted it off a bit, then distressed around the various curves and in some flat areas. Continue dipping, blotting, and applying as necessary, until you’ve reached the desired effect. There’s so much room for expression of taste and style on this step. Distress it as much or as little as you please!
You’ll find that a little bit of the wash goes a really long way! If I decided a certain area was distressed too heavily and didn’t match the others, I let it dry, then painted over it with the chalk paint and started up again.
Allow the distress wash to dry completely, then give it a finishing coat of DecoArt Creme Wax to seal everything in and make it clean-able. Be sure to use a good quality paint brush for all of these steps.
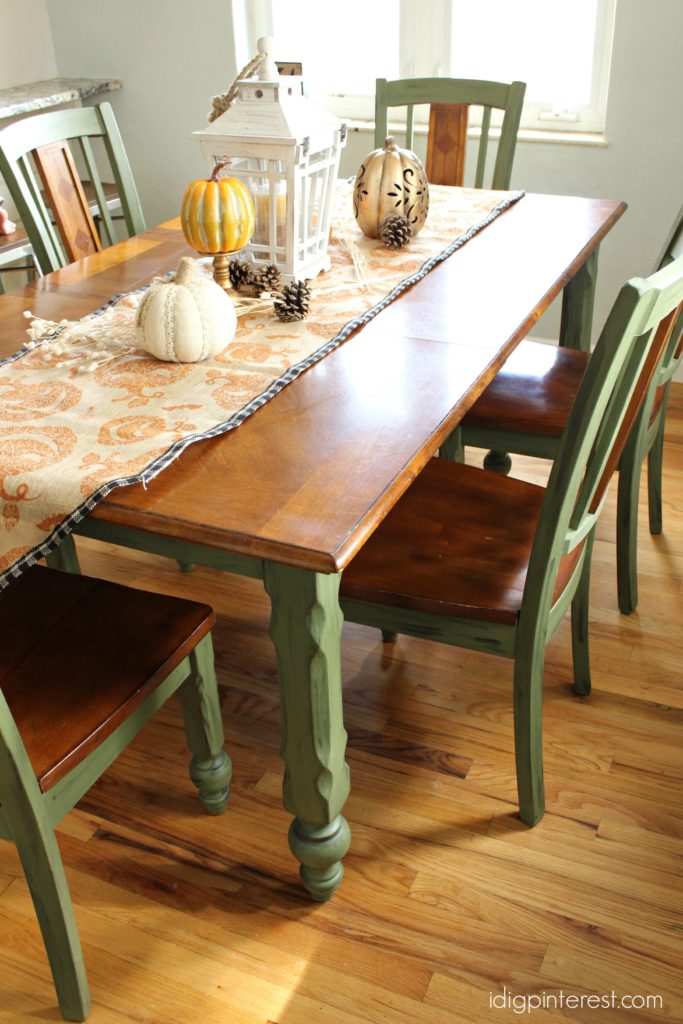
The transformation is nothing short of incredible! I’m so pleased with our “new” table! This technique is a very inexpensive way to totally change the look of an existing piece of furniture that you may not love as is. Our dining area is so much improved now! I’m hoping this sturdy table will become a family heirloom!
Which shade of chalky finish paint is your favorite?
To see more home improvement projects like this, go HERE.


